Somehow, somewhere along the line, I have acquired a couple of recurring jobs as a MailChimp newsletter creator. Similar to Constant Contact, MailChimp has placed itself in a market position aimed at folks who may know they need a way to get content directly in their followers’ inboxes, but don’t want to deal with Constant Contact’s constant marketing of itself. Like WordPress, MailChimp is surprisingly easy once you have tackled the task of putting together your first newsletter, but if you need help getting over that initial “What do I do?” stage, you’ve come to the right place!
I think that MailChimp is like many other online tools. Once you have done what you go there to do a few times, it becomes second nature. It’s all in knowing what bells and whistles you really need and where to find them in the dashboard.
Step 1: Log In

When you created your MailChimp account it involved creating a login. (I hope you saved it in a safe place!) So, go to mailchimp.com and in the upper right corner you will see a link that says “Log In”. Start there.
Step 2: Let’s Make a Newsletter!

Once you are logged in, you should see a grey button in the upper right of the page that says “Create a Campaign”. There’s a little down arrow on the button. Click that and you will get a choice of which type of campaign to create. Let’s start with a Regular Campaign. This is the type of email you get that has the nice image header at the top and looks like a traditional newsletter.

Step 3: Select your List

Some clients of mine use different lists for different newsletters. So, this is the step where one would decide which list to send to. Unfortunately, you can only send a newsletter to one list at a time (but don’t worry, it’s easy to replicate a campaign for a different list.)
So, select your list, refine it maybe and then click “Next”
Step 4: Now the fun begins!

In the next screen, you are going to create a name for your campaign (for finding it again in the dashboard archives) and then you are going to give it a title (which is what your recipients will see.) Also, you will need to put in who the list is coming from (your name or the name of your organization) and then your email address that is sending the list. It can be the email address you used to create your MailChimp account. Or, if you want to use a different one, put it here. You can also choose whether you want to track email opens (always a good idea) and if you want to connect the email campaign to any social media accounts.
A note about Gmail: If you want to use a Gmail account to send your email, MailChimp will double/triple check that you understand that some folks’ email programs might flag your newsletter as spam. It’s not the end of the world. We live in an electronic world where people get bombarded by spammers all day long to MC just wants to make sure you understand the risks.
Bonus Tip: If your list includes subscribers’ first and last names, then you can also click the “Personalize the to field” box and their email will say “Dear John” (or their actual name of course)
Step 5: Select A Template

MailChimp provides you with several different methods to use a template. If you are just starting to create newsletters, then you can start your first one by using one of many pre-coded layouts. There are single column layouts, multi-column ones and combination layouts.
If you have a template that you want to use that already has the header and footer and some other basic elements added, then you would go to Saved Templates and select one there.
You can also use a previous newsletter for a template like in the image above. Just click on Campaigns and then Select next to the previous newsletter you want to use.
Step 6: Open Your Template to Edit

Once you click inside the text area of the template, you will see an editing window pop up in the right side of the screen. This is where you are going to create the body of your newsletter. There will be the text from your previous campaign in there of course, but you can delete that. I tend to use some things over and over in each newsletter edition, so I keep those items towards the bottom of each newsletter and save the top part for the new content.
A Rough Guide to the Editing Tools
 Much like WordPress or a Word Document or even an email program, MailChimp provides some tools to format and edit your text. From left to right starting on the top row we have: Bold, Italicize, Underline, Create a Hyperlink, Remove a Hyperlink, Add an Image, Create an Ordered List, Create an Unordered List, Paste in Unformatted Text, Paste in Word Formatted Text, Clear Previous Styles and View HTML Code.
The bottom row from left to right: Text Format (paragraph, header etc), Select a Font, Text Size, Text Color, Text Background Color, Horizontal Line, Anchor Link, Merge Tags (in case you want to insert a recipient’s name, email address or other variable), Text Direction, Text Alignment, Spellcheck, Undo and Redo.
A couple of style guidelines: 1: Keep your text in short, easy to read paragraphs to encourage people to read your news. 2: Break up sections with headers and don’t be afraid to use color! You will find that the right balance of visual interest and easy to read content will vastly improve your “open rate”!
Step 7: Add Some Images!

Photo by Debi Green
Of course your text will be well written and fun to read, but what can really draw a reader in is a strong image or images. First things first. You will most likely need to resize your images. Using a photo directly from your smart phone will create a pretty big image that will be overkill and can even eat up your usage quota, not to mention, blow your nice layout out of the water. So, before you upload that 3 megabyte iPhone 6 photo to your MailChimp account, make sure you resize it first.
Ways to Resize Photos:
You can get fancy with an online photo editor like Pixlr or Pic Monkey. If you are going to be using an image from a professional camera or even a pocket camera then that’s a good route. Hey, you might even have Photoshop on your computer and that’s great too.
However, if you really want to make your life simple and you don’t like the idea of opening up yet another account online somewhere, try this hack. Open up your photos on your phone and go to the one you want to use. You can crop it if you want by clicking Edit. Then, with the photo selected on your phone, click Next in the top right corner and then select the Mail option. Email it to yourself. Just before you send it, your phone will ask you which size to send it (Small, Medium, Large, Actual Size). Pick Large so you don’t limit your options too much and Boom! You have just emailed yourself a copy of the photo in a size that won’t be too big for your newsletter. Now you can just go to your email on your computer, download the photo and save it in a folder and then it’s ready to upload to Mailchimp.
Inserting a photo into a newsletter
Remember the little “insert image” button on the toolbar? It’s the one that looks like this:

Tip: this little mountain landscape is the universal symbol for “add an image”
So, in your editing window, click in the text where you would like the photo to appear. Then there will be a screen that lets you choose whether you want to use a previously uploaded photo, or one from your computer or even elsewhere on the web (like from a Flickr account). For simplicity’s sake, let’s say you want to upload a photo from your computer. For that, you click “Upload” in the upper right.

Next, a window will pop up with a way for you to navigate on your computer to where you have your photo stored. Once you find it, click on it and then click “Open”.

Now, the photo will be uploaded to MailChimp and you can click “Select” to insert it into your newsletter.

You should then see the image in the body of the newsletter. If you click on it, you can change the alignment just like you would for text.

Some Text Editing Tools
I would be remiss if I didn’t show you a couple of useful tools to make your newsletter format easy to read. If you have a bit of text that you would like to use as a headline, simply highlight it and then click on the Text Size button to choose a size.

You also have a text color button so use that to bring some life to your format. Tip, don’t go too crazy with a different color for each headline. That can just make your newsletter look too busy.

Don’t see the exact shade you want? Click More Colors!
Step 8: Preview and Test

If you look in the upper right screen of your newsletter editing screen, you will see a link that says “Preview & Test”. My advice is to always send a test to yourself before you actually send the email. You would be surprised how often spelling mistakes, formatting issues and leftover bits from the previous newsletter can escape your notice when you are in the editing “zone”. Enter your email address and MailChimp will email you what you have done so you can see it just like a subscriber would.
Open the newsletter in your email and see if it reads easily, check for errors and make sure the images are in the right place. Always scroll aaalll the way down just to make sure you don’t miss any extra bits that got pushed down while you were editing!
Step 9: Send It!

Yay! Now it looks good and you are ready to send it out into the world! While you were going through setting up your newsletter, you probably noticed that at the very bottom of the screen there are links to each basic step of sending out a newsletter. “Confirm” is MailChimp’s term for “Get this thing sent out already!”. Click Confirm.
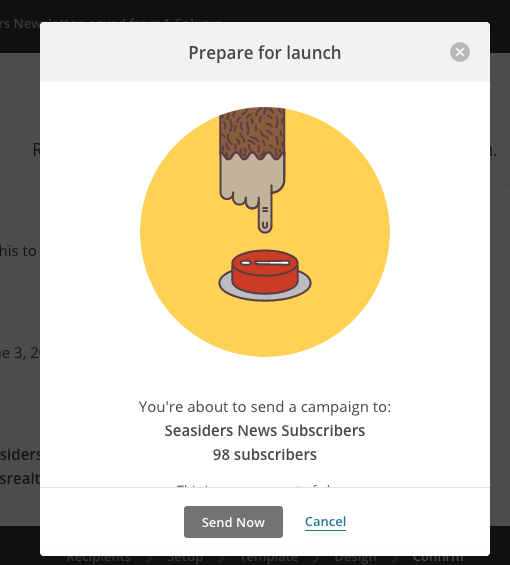
Next, MailChimp will ask you if you want to schedule your newsletter or if you are ready to send it right now. It’s purely up to you. Me, I like the little animation that comes next.

Click “Send Now” and MailChimp will tell you it’s “ushering your campaign into the queue”. Wait a few seconds and then you should see this:

I love the way they hide a little 5 in the paw!
Congratulations! You just sent out a newsletter!