One of the most common types of modules found in a Divi site is the Text module. Clicking on the 3 horizontal bars in the top left of any module will open it for editing its content and settings.
Here’s a quick tour around the editing module.
Starting from the top left and working around clockwise:
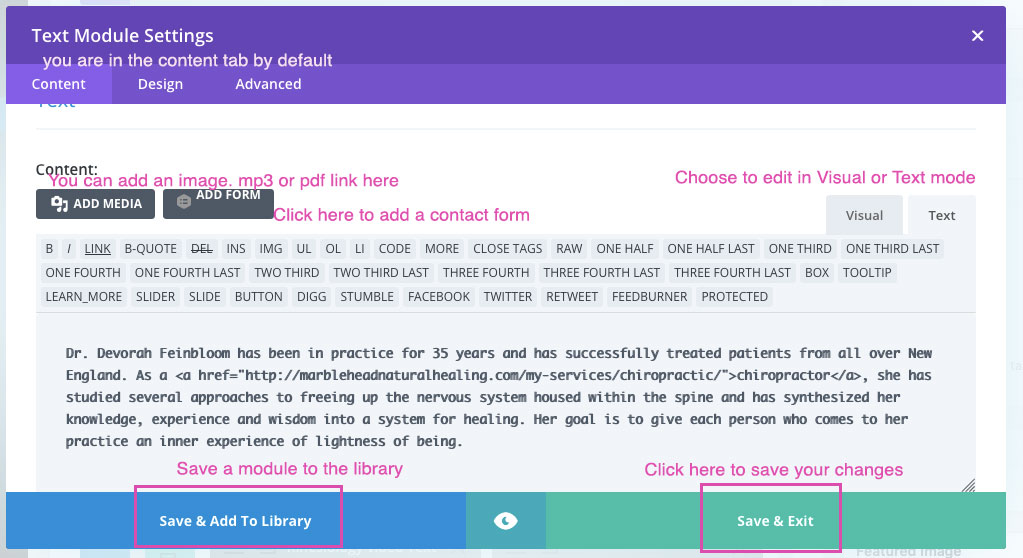
The three tabs on the top left are called Content, Design & Advanced.
Content is open by default and it’s where you edit the text, images and basically what information the user will see.
Design is for changing the appearance of the module. You can fine tune settings such as typography, content alignment in the browser window, padding and margins etc.
Advanced is for finetuning some aspects of the layout such as its behavior on different devices and animation behaviors.
Add Media is for adding an image or mp3 file directly to a text module. A pdf is also considered a media file but for those I usually add it to the Media Library directly (far left main toolbar) and then link to it in a text link.
Note: there is also a stand-alone Image module that would be used for images you want to have on their own row or in a separate column from the text module.
Add Form is shown when you have the Gravity Forms plugin installed. If you would like to have a form built using Gravity Forms displayed withing a text module, you would use this button to insert the form where you would like in the module.
Note: If you want to have a module for just a gravity form, you can still use the Text Module and just insert the form with the button. Divi also has its own Contact Form module that can be used as well.
Visual and Text mode Personally, I tend to edit text modules in Text mode so I can see exactly what is going on. However, if you want to quickly format text, it’s much easier to do so in Visual mode. You can highlight any text you want to format and then select tools such as links and so forth.
Save and add to Library I will cover this more in depth in a later post, but for now, I will tell you that if you feel that you will be using a module elsewhere on your site, it saves a lot of time to add a module to your Divi Library and then when you want to use it again (or with different text but the same design) you can choose to add it back in from the library.
Save and Exit Once you are done with an edit and ready to see your changes, click Save and Exit to get out of edit mode. Make sure you update the page as well before seeing your changes!
Linking text in the text module
Creating a text link in a text module is easy once you have done it a couple of times. Basically all you need to do is highlight the text you want as a link with your cursor and then click the little chainlink icon in Visual Mode or the word “link” in the editing toolbar in Text Edit mode.
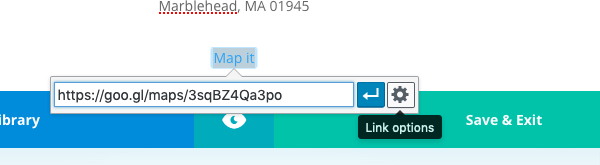
Paste your link into the field and then you can click the cog icon to see link options. You can choose to open the link in a new tab (if it’s a different site) or in the same tab (if you don’t worry about people leaving the page). Click the arrow to apply your changes.
Formatting text in the text module using Visual mode
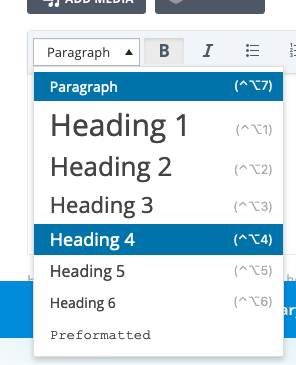
WordPress text editing options are fairly similar to editing a Word document. If you highlight your text, you can choose to make text bold, italic, underlined or even create a list. There is also a dropdown tool that lets you set text as a paragraph or a headline. You can even change the text color.

Text Editor options
Editing options in Text edit mode are different. You don’t have the same options such as paragraph and header, but you can choose to put your text into columns, add a social media profile, add a Tooltip and set text to be only accessible to someone who is logged in.
Adding an Image in the text module
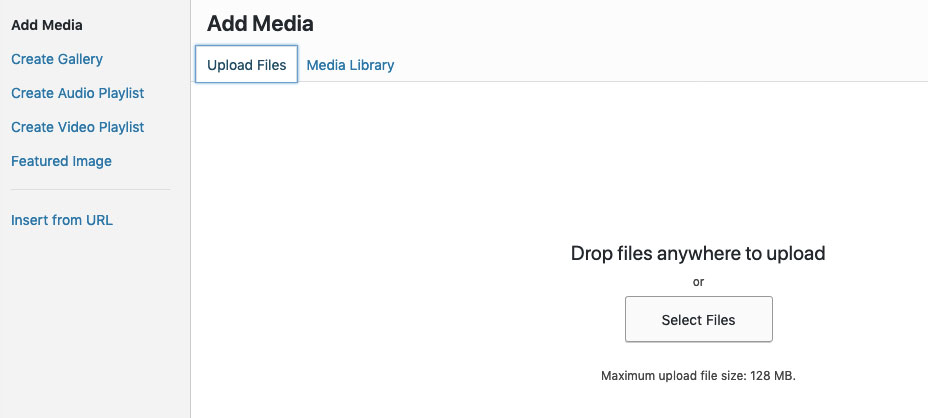
You can add an image as its own separate module, but if you want to just have it inline with your text, you can add it via the Media button in the top left of the editing window. Just click in your text where you would like to insert an image. Then, click the Media button.
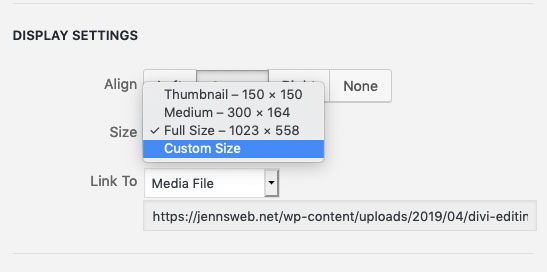
You can either choose a file you previously uploaded image via the Media Library, or, upload a new image via the Upload tab. When you choose the image, make sure you pay attention to the size and alignment choices which are in the bottom right of the insert image screen.
Here’s the right side of the Insert Media window
You can see where to select the image size and alignment in the bottom.
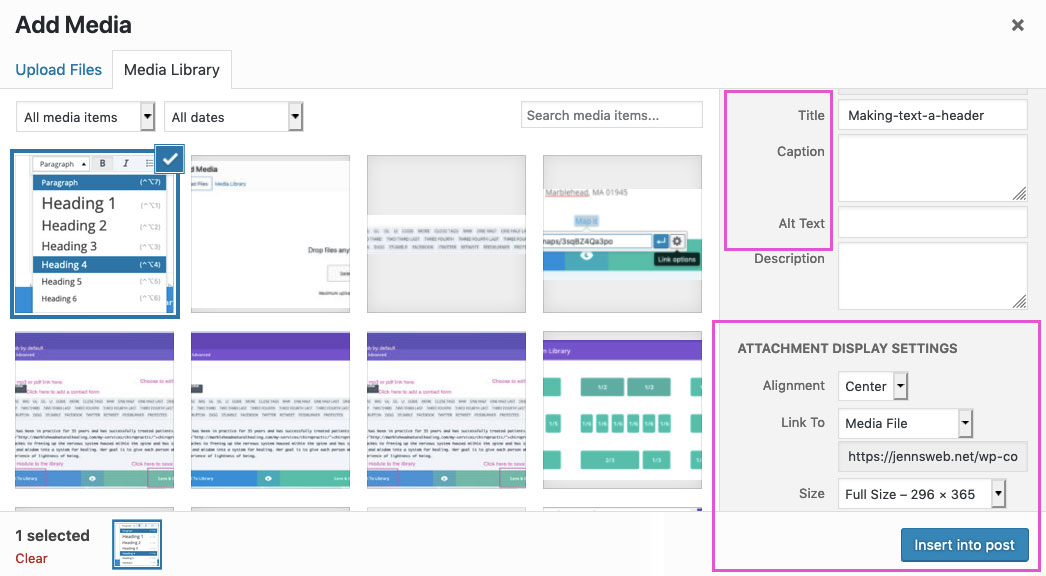
What about the fields at the top right?
Often people are in such a rush to get something posted that they simply insert the image and move on, but it’s very important to pay attention to them.
Title By default, WordPress will simply use the file name of your image. If you are creating a Gallery, you can edit the title so you can show a title so “IMG2019abc.jpg” can be turned into “Portrait of my dog”.
Caption If you feel that your image should have a caption, put that in te Caption field.
Alt Text Alt text can be a factor in how Google crawls your site and indexes it for keywords. So, it’s good to get in the habit of creating alt text when you upload an image. There’s another reason as well. Site users who are visually impaired may be using a screen reader to use your site and screen readers can use either the alt text field or the description field to describe the image. In fact, visually impaired web users I have talked to have told me that they find it pretty frustrating to know that an image contains key information and it’s only described to them as “Image number 0029.jpg”
Description If you want, keep the Alt text field brief and make sure to include a keyword or two. Then, use the description field to describe the image in more detail and include any information in the image that is not included in the surrounding text or caption.
TIP: Make sure you are uploading images that are sized correctly for a website (both in file size and image dimensions)
Here’s an article that explains how to deal with image size for your wordpress site.
https://jennsweb.net/using-images-in-wordpress-size-matters/
Uh oh. The image I uploaded is too big!
As long as you uploaded a web-optimized image (see link above), you can customize the size. In Visual editing mode, click on the image, and then the little pencil icon to open it for editing. Where it says “image size” choose “Custom” and then either use the down arrow or type in your desired size to proportionally then save your changes with the Update button.