
I have a WordPress site! Yay! ….now what?
As someone who works with WordPress all the time, I have gotten very used to all the ins and outs of the dashboard and how WP works. Even with all that’s changed over the years and all the updates that have happened, I can still remember my first time using the dashboard and feeling a little overwhelmed by everything. That’s why I decided to create a series that can help guide you through how to keep your WordPress site up to date both on the front and the back end.
Logging In to your WordPress Site
To log into your site, you need to use your site’s url with a little extra bit added at the end. Your login web address will most likely be http://www.yourdomainname.com/wp-admin

The typical WordPress login screen
Dang it! I forgot my password!
Never fear! The folks at WordPress have your back. If you don’t remember your password, then click on the link underneath the login fields that says “Lost your password?” and then provide either your user name or the email address associated with your profile and WordPress will send an email with a link to re-set your password.
Note: I highly recommend taking advantage of your browser’s built in password storage function so you won’t have to type the password in every time. Also, there’s that little box across from the login button that says “Remember me”. Click that the first time you log in. Once you’ve stored your username and password either on your browser or with WordPress or both, then you can start to type in your user name, and WordPress will automatically fill in the password.
Welcome to the dashboard
Once you log in, you will see the dashboard home page. Depending on how your site is configured you may see a slightly different one than another site owner. To be honest, 90% of my clients use only about 10% of the features available through the dashboard. And that’s OK. If you only use your site to write blog posts then just make sure you learn how to make blog posts the right way.
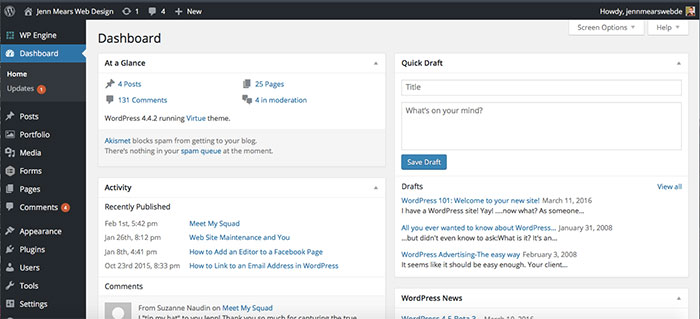
Your Dashboard Map

Your dashboard home page
The Top Menu
Starting at the top left corner here are the features that you should know about in order to use WordPress to its full advantage:
The little house icon in the corner is one of the many ways you can access the front end of the site (what the public sees). If you hover over it, or click on it, you will be taken to your site’s home page.
The next two items deal with updates needed (the little round arrows) and then a little conversation icon. The numbers next to them let you know how many items need updating and how many comments need moderating respectively.
Moving on we see a little plus sign with the word New.

+ New in the top menu
Depending on your theme, or plugin setup, you may see different items, but you can easily get to a function like adding a new post or page or media item (image or video) here.
On the far right you see a greeting, something like “Howdy, yourusername”. If you hover over that text, you will see links to edit your profile (in case you want to reset your password after you’ve logged in or update your email address) as well as a link to sign out of the dashboard.
The Left Side Menu
 So, here we have the section of the dashboard that you are likely to become very familiar with. This is where you can add new content, upload or edit photos and work with other features depending on how your particular site is set up.
Posts can be used for a lot of different things on your site such as directories or portfolios but for simplicity’s sake lets assume that you have a blog on your site that you plan to update on a regular basis. If you want to see every post that you’ve published, click on the name Posts and you will see a list of posts with some details such as which category they are in and who wrote them.
Once you are in the Posts section, that menu will stay open so you can then see the subsections such as “All Posts”, “Add New” (where you would go to add a new post to the site), Categories (where you can work with the Categories posts go in and edit or add categories), and Tags.
Categories and Tags are important to get a grasp of since that is how your posts are found by your readers. The more organized and clearly labeled your content is, the easier it is for readers to find it. The easier it is for readers to find it, the more likely they are to come to your site. It’s that simple.
So, here’s how I explain it to clients: Think of the non-fiction section of your local library. It’s broken into various areas of interest such as History, Art, Biographies, Science and so on. Categories of posts are organized the same way, broad areas that fall into general topics, maybe Company News, Client News, Tutorials and Tips. Tags are basically keywords so someone can search within those categories. Let’s say you do a search of the catalog in your library. You may search by a particular topic such as English history or by a particular author so you enter that term into the catalog search in order to come up with exactly the book you are looking for. That’s the beauty of tags. They give you a tool to search a blog with a specific keyword and at the same time find out which topics a blog specializes in. You can see it in action if you look at the sidebar of this post at where it says Find a Post By Keyword.
Pages is the next thing I want to cover on the toolbar since it’s the next type of content that is universal on WordPress sites. A page is different than a post in a few ways.
A page is like a page on a traditional business website. You can have a page for your company’s About Us info, a page for people to contact you, and a page that lists all the services your company offers. Sometimes I try to explain it as the “brochure” portion of your site. It’s content that doesn’t really change that often and you would like it to be in the same place on your site at all times. (Think of posts as like press releases)
Sometimes people get confused because editing a post and editing a page feel like kind of the same thing. It’s true that the editing interface looks very similar but a post has some extra things to the right such as Categories, Tags and Featured Image and a page will have a place to choose a template and a parent page.
Tip: if you aren’t sure if your content that you want to put on the site should be a post or a page, ask yourself “Would I put this info on my company’s brochure?” If you think it’s a little too specific or ephemeral, then make it a post! BROCHURE=PAGE / NEWSLETTER=POST
The next area that you will probably find yourself using in the dashboard is the Media section. This is where you can manage your site’s images. There’s a lot of fun stuff that you can do with the pictures that you upload to WordPress. I use a plugin called Photospace to create some pretty nice galleries on some clients’ sites. You should definitely check out the Media Library. Let’s say you want to add some keywords or captions to a bunch of images at once. Simply go to the media library and find those images and you can edit them in the library instead of having to find and open each post and page that they are in.

Here’s what the Media Library looks like
Oh no! The picture I uploaded is HUGE!
This is the best WordPress feature since pages. If you uploaded an image and you find that it’s too big for your layout, you can customize the size to EXACTLY the right dimensions on the fly. Here’s how it’s done.
Step 1: In Visual Mode (where you can see the image), click on the image to bring up its toolbar

Step 2: Select Custom Size under the DISPLAY SETTINGS feature

Step 3: In the next screen, simply use the up and down arrows to customize the size down to where it looks good for you.

Easy!
Comments is the next section that you may find yourself dealing with on a regular basis. To be honest, I have seen some clients get so freaked out when one of their posts gets a response that they ask me to remove comments altogether! Here’s one thing that you should be aware of. If you are going to allow readers to comment on your posts, be prepared for dealing with spammers. Much like the mosquito, a spammer seemingly has absolutely no real reason to exist. That is why the developers of WordPress created a plugin called Akismet. Akismet acts like a bouncer at an exclusive nightclub. It scans a comment someone leaves on your site and if it bears the characteristics of spam such as lots of links or text that has absolutely nothing to do with the content of your post, it will hold it from getting into your site and acting obnoxious.

The Comments toolbar
These are fairly self-explanatory so I won’t berate the obvious. One thing to bear in mind; it’s good “housekeeping” to go to this section on a regular basis and clean out any spam in the spam filter.
And that is pretty much what you need to get started with publishing content on your WordPress site on your own! It’s like any new online experience. It seems a little overwhelming at first, but the more you get in there and do it, the easier it gets! I actually worked with a client to transfer a site from Frontpage (?!) to WordPress and after 8 months of hearing “Frontpage is so easy! I’ll never figure WordPress out!”, she “got” it and now puts up more new content than any other client!
But wait! What about the rest of that stuff in the toolbar?
Yes, I realize that I am leaving out things such as Appearance and Tools and Settings for now. I wanted to touch on the things that you will use to publish content first before delving into the “geeky” part of WordPress. It’s not that your site will implode if you click on something. By all means, feel free to click around the dashboard to your heart’s content! I just want to save those tools for further posts.
Next up, Creating your content!

Nice work Jenn!